가이드
PA Tools의 각 도구별 사용법을 확인하세요.
쉽고 빠르게 콘텐츠 작업을 완료할 수 있습니다.
GIF 효과 넣기 — 상세 가이드
내 이미지에 반짝이, 불꽃, 글리치 등 움직이는 효과를 넣어 GIF / WebP / MP4로 만들 수 있어요.
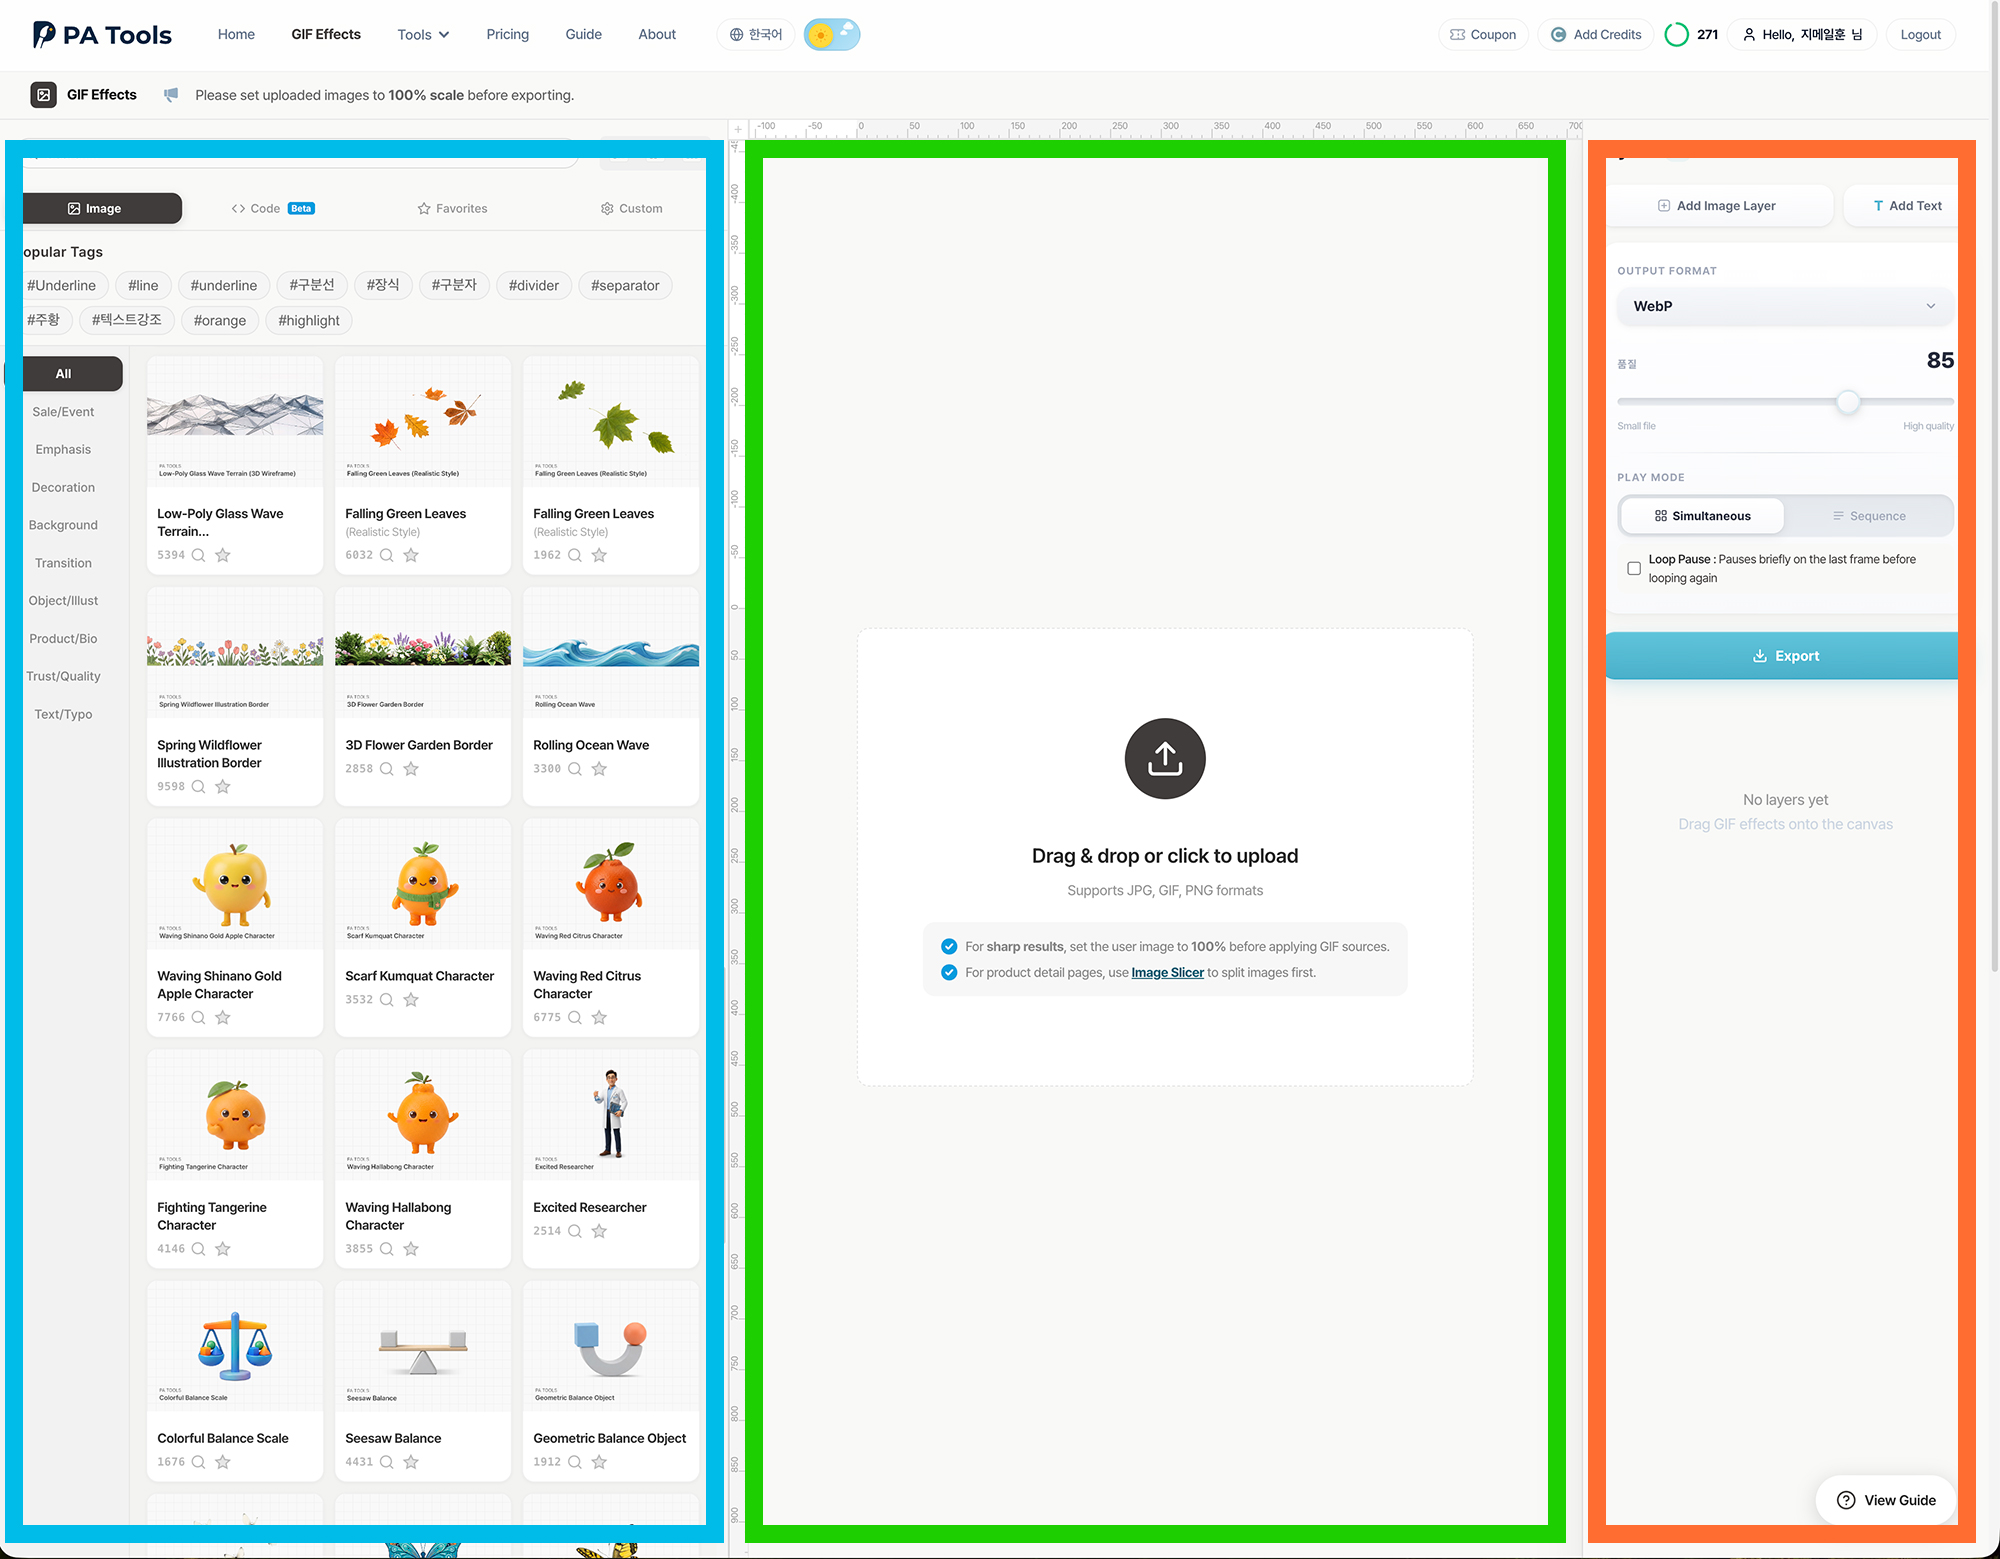
1. 화면 구성 알아보기
GIF 에디터 화면은 크게 3개 영역으로 나뉘어요. 각 영역의 역할을 알아볼까요?
2. 기본 사용법 — 따라하기
처음 사용하는 분도 쉽게 따라할 수 있도록 하나씩 알려드릴게요!
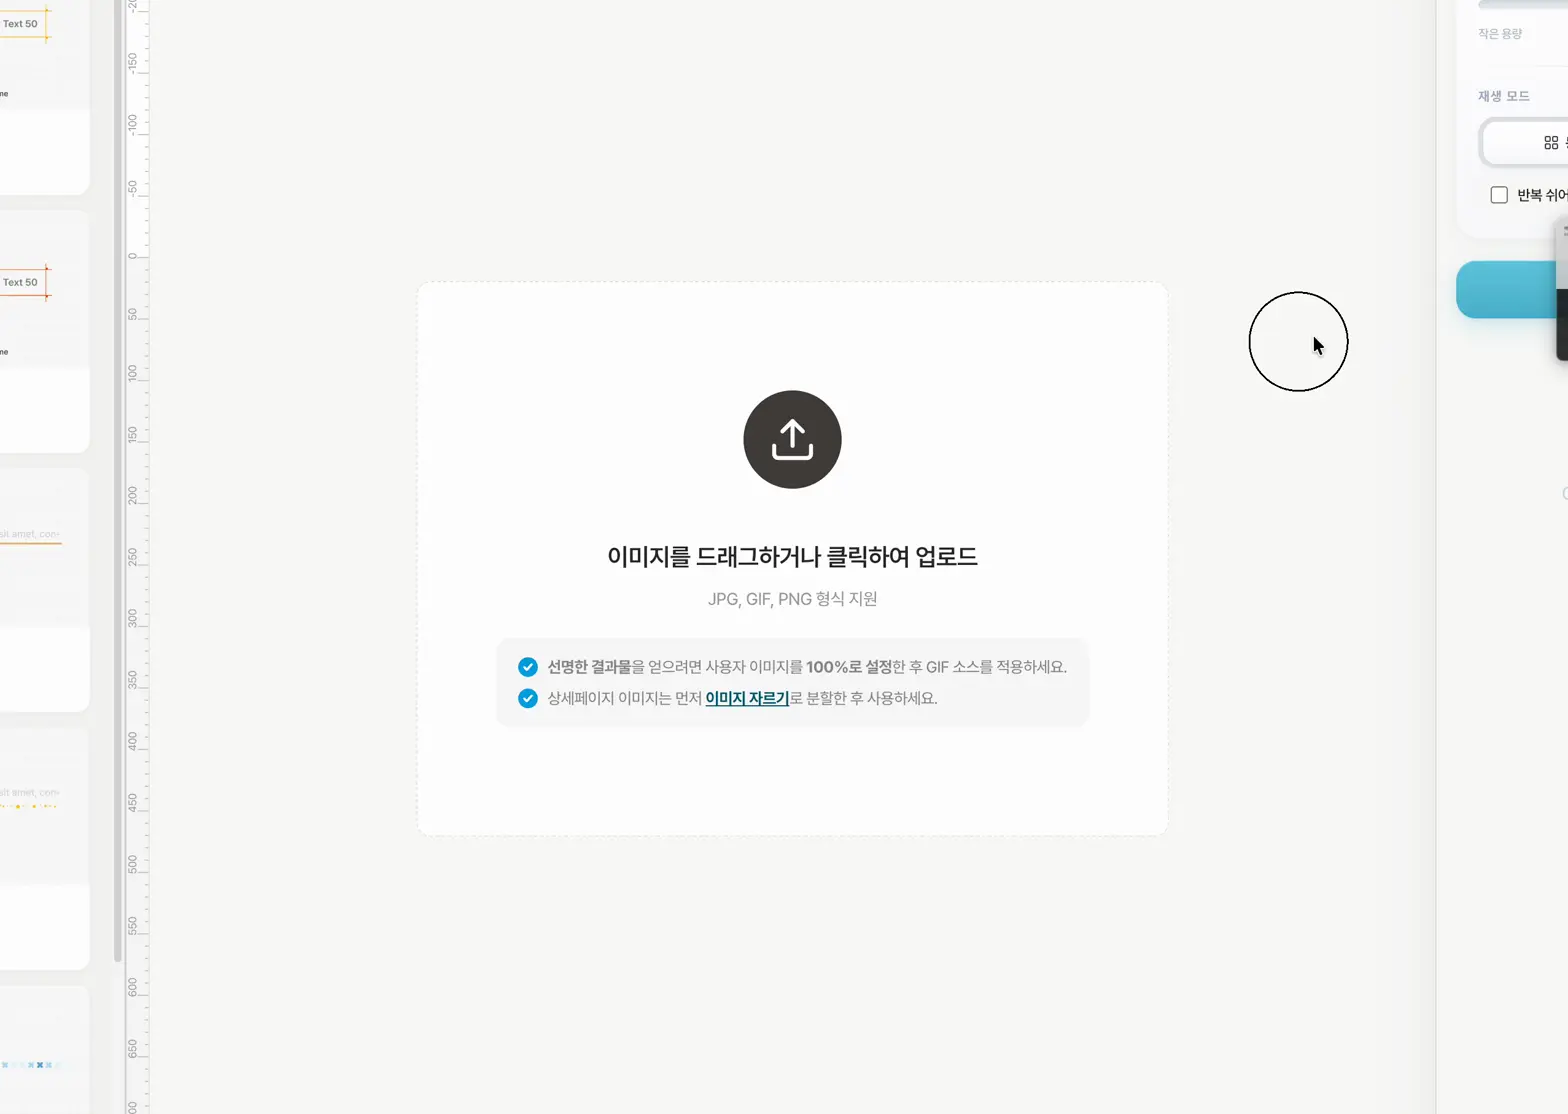
화면 가운데 점선 박스를 클릭하거나, 컴퓨터에서 이미지 파일을 끌어다 놓으세요 (드래그 앤 드롭). JPG, PNG, GIF 파일을 올릴 수 있어요. 파일 크기는 최대 50MB까지 가능해요.
왼쪽 패널에서 마음에 드는 효과를 찾아 클릭하면 캔버스 위에 효과가 올라가요. 효과를 직접 캔버스 위로 끌어다 놓을 수도 있어요(드래그). 원하는 위치에 정확하게 놓을 수 있어서 편해요!
캔버스 위의 효과를 마우스로 끌어서 원하는 위치로 옮겨 보세요. 효과 주위에 생기는 작은 네모(핸들)를 잡고 끌면 크기도 바꿀 수 있어요. 위에 있는 둥근 핸들을 돌리면 회전도 돼요!
오른쪽 패널에서 원하는 포맷(WebP, GIF, MP4, APNG)을 선택하고, 아래쪽 파란 '내보내기' 버튼을 눌러요. 잠시 기다리면 파일이 자동으로 다운로드돼요!
3. 효과 찾기
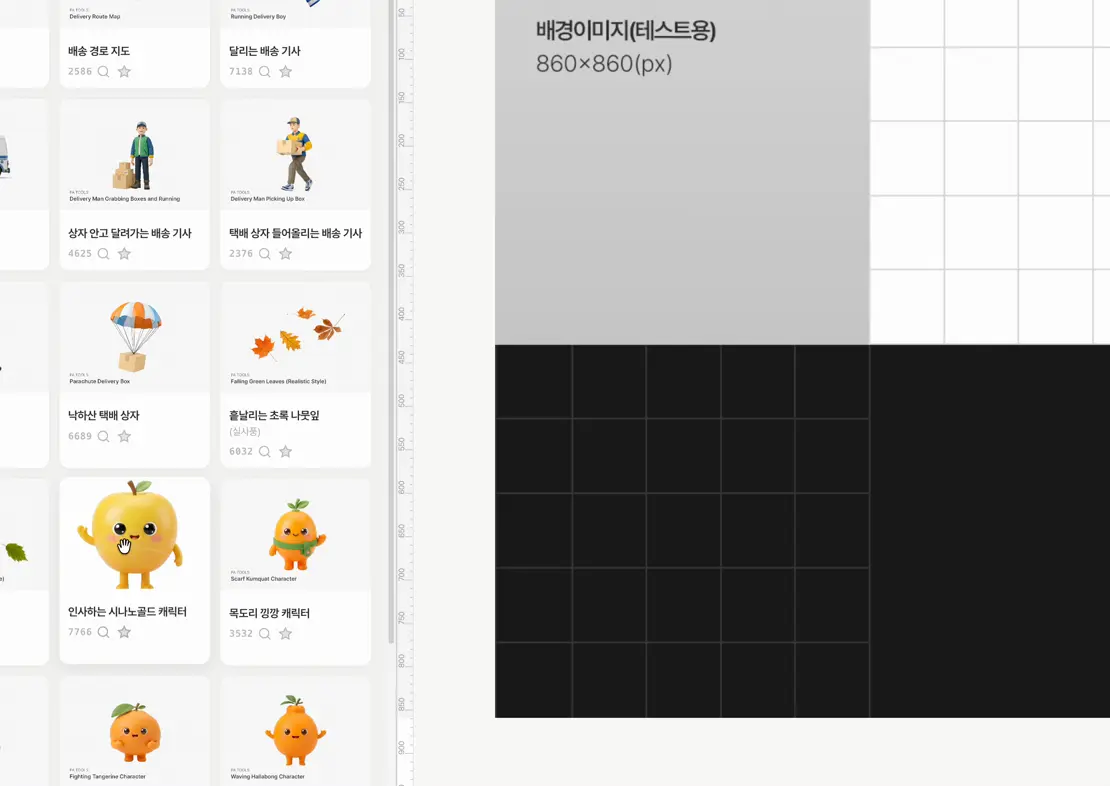
왼쪽 패널에는 수백 가지 효과가 들어 있어요. 원하는 효과를 빠르게 찾는 방법을 알아볼까요?
카테고리별 탐색
왼쪽 패널 위쪽에 '버튼', '화살표', '반짝임' 같은 카테고리 버튼이 있어요. 클릭하면 해당 종류의 효과만 모아서 보여줘요. '인기' 태그를 누르면 가장 많이 쓰이는 효과를 볼 수 있어요.
검색하기
왼쪽 위 검색창에 키워드를 입력하면 실시간으로 검색돼요. 한글 키보드로 입력해도 자동으로 영어로 바꿔서 검색해줘요! (예: 한글 'ㅁ'을 입력하면 자동으로 'a'로 바꿔줘요.)
GIF 코드로 찾기
각 효과마다 고유한 4자리 코드가 있어요. 코드를 알고 있으면 검색창에 입력해서 바로 찾을 수 있어요. 코드 이펙트는 'C' + 3자리 숫자(예: C001)로 검색해요.
4개의 탭
- 프리셋 — 미리 만들어진 GIF 효과를 둘러봐요
- 코드 — 반짝임, 불꽃, 글리치 같은 57종 이상의 코드 이펙트를 사용해요
- 즐겨찾기 — 자주 쓰는 효과에 별을 눌러 저장해두면 여기서 빠르게 꺼내요
- 맞춤 소스 — 내가 직접 올린 GIF를 사용해요
패널 크기 바꾸기
왼쪽 패널 오른쪽 위에 있는 작은 버튼으로 패널 크기를 바꿀 수 있어요. 1단(좁게), 2단(보통), 3단(넓게) 중에서 골라요.
미리보기
효과 카드 위에 있는 돋보기 버튼을 누르면 효과를 크게 미리 볼 수 있어요.
4. 레이어 관리하기
'레이어'란 겹겹이 쌓인 투명한 종이 같은 거예요. 배경 이미지 위에 효과를 여러 개 올릴 수 있고, 각각 따로 움직이거나 설정할 수 있어요.
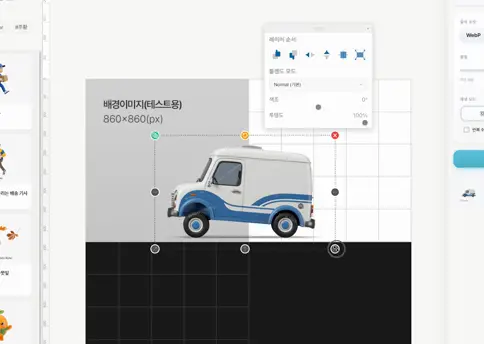
레이어 세부 설정
레이어를 클릭하면 아래와 같은 설정을 할 수 있어요:
- 투명도 조절 — 슬라이더로 효과를 투명하게 / 진하게 만들어요 (0~100%)
- 좌우/상하 반전 — 효과를 거울처럼 뒤집어요
- 가운데 정렬 — 효과를 캔버스 한가운데로 보내요
- 캔버스에 맞추기 — 효과를 캔버스 크기에 딱 맞게 늘려요
- 블렌드 모드 — 효과가 배경과 섞이는 방식을 바꿔요 (Multiply, Screen 등)
- 색조(Hue) 조절 — 효과의 색감을 바꿔요
- 크기 직접 입력 — 레이어 패널에서 너비x높이 숫자를 직접 수정할 수 있어요
- 위치 조절 — X, Y 좌표를 숫자로 입력해서 정확한 위치에 놓을 수 있어요
5. 텍스트(글자) 넣기
이미지 위에 예쁜 글자도 넣을 수 있어요!
오른쪽 패널 위의 'T 텍스트 추가' 버튼을 클릭해요.
팝업 창이 뜨면 원하는 글자를 입력하고, 글꼴(폰트), 크기, 색상을 골라요. 글자 테두리(외곽선)와 그림자도 넣을 수 있어요!
캔버스에 추가된 글자를 마우스로 끌어서 원하는 곳에 놓으세요. 크기 조절과 회전도 돼요.
텍스트 편집 팁
- 캔버스 위의 글자를 더블클릭하면 바로 편집 창이 열려요.
- 레이어 패널에서 연필 아이콘을 눌러도 편집할 수 있어요.
6. 코드 이펙트 (57종+)
코드 이펙트는 프로그래밍으로 만든 특별한 효과예요. 반짝임, 불꽃, 눈 내리기 등 57가지 이상의 효과를 색상, 크기, 속도까지 자유롭게 바꿀 수 있어요!
코드 이펙트 종류
- 파티클 — 반짝임, 색종이, 불꽃, 하트, 눈, 비, 거품, 유성, 벚꽃, 나비 등
- 빛/에너지 — 빛줄기, 물결, 글로우, 샤인, 오로라, 번개 등
- 시각 효과 — 보케, 매트릭스, 만화경, 모자이크, 물결 파동 등
- 텍스트 — 타이핑, 카운트다운, 텍스트 글로우, 스크롤 텍스트 등
- 전환 — 와이프, 셔터, 원형 와이프, 디졸브 등
- 프레임 — 네온 프레임, 체크마크, 밑줄 스윕, 원형 강조 등
- 레트로 — 글리치, VHS, 스캔라인 등
사용 방법
왼쪽 패널에서 '코드' 탭을 선택하면 모든 코드 이펙트를 볼 수 있어요. 효과를 클릭하면 캔버스에 추가되고, 레이어 카드에서 색상, 크기, 속도 등을 바꿀 수 있어요.
7. 재생 모드
효과가 여러 개일 때, 동시에 다 보일지 하나씩 차례대로 나올지 정할 수 있어요.
추가 옵션
- 루프 홀드 (쉬어가기) — 마지막 장면에서 잠깐 멈춘 뒤 다시 반복해요. 멈추는 시간은 0.5초~5초까지 조절할 수 있어요.
- 누적 모드 — 순차재생에서 이전 효과가 사라지지 않고 화면에 남아있어요.
8. 내보내기 — 포맷과 품질
만든 작품을 파일로 저장할 때, 4가지 포맷 중에서 고를 수 있어요.
품질 설정
- WebP 품질 — 슬라이더를 왼쪽으로 밀면 파일이 작아지고, 오른쪽으로 밀면 화질이 좋아져요. (기본: 85)
- MP4 품질 — 숫자가 낮을수록 화질이 좋고, 높을수록 파일이 작아요. (기본: 23)
크레딧
내보내기 할 때마다 크레딧이 사용돼요. 일반 효과는 1크레딧, 프리미엄 효과(금색 PREMIUM 표시)가 포함되면 2크레딧이에요. 같은 프로젝트를 다시 내보내기 하면 추가 크레딧이 들지 않아요!
9. 키보드 단축키
마우스 없이 키보드로도 빠르게 조작할 수 있어요! 자주 쓰는 단축키를 알아두면 작업이 훨씬 빨라져요.
| 단축키 | 하는 일 |
|---|---|
| Ctrl + Z | 실행 취소 (방금 한 걸 되돌리기) |
| Ctrl + Shift + Z | 다시 실행 (되돌린 걸 다시 하기) |
| Ctrl + S | 내보내기 (저장하기) |
| Delete 또는 Backspace | 선택한 레이어 삭제하기 |
| ← → ↑ ↓ | 선택한 레이어를 1픽셀씩 이동 |
| Shift + 방향키 | 선택한 레이어를 10픽셀씩 이동 (빠른 이동) |
| Escape | 선택 해제하기 |
Mac 사용자
- Ctrl 대신 Cmd(⌘) 를 사용하세요.
10. 알아두면 좋은 꿀팁
꿀팁 모음
- 효과를 왼쪽 패널에서 캔버스로 드래그하면 원하는 위치에 정확하게 놓을 수 있어요.
- Shift + 방향키를 누르면 한 번에 10픽셀씩 빠르게 이동해요.
- 텍스트 레이어를 더블클릭하면 바로 편집 창이 열려요.
- 한글 키보드 상태에서 검색해도 자동으로 영어로 변환해서 검색해줘요.
- 같은 프로젝트를 다시 내보내기 하면 크레딧이 추가로 들지 않아요.
- 웹용 이미지는 WebP 포맷이 파일 크기도 작고 화질도 좋아서 추천해요.
- 효과가 흔들리거나 이상하면, Ctrl+Z로 바로 되돌릴 수 있어요. (최대 30번까지!)
- 레이어를 잠그면 실수로 건드리지 않아서 안전해요.
- 줌(확대/축소) 기능으로 세밀한 위치 조정을 해 보세요. (10%~300%)
- 브라우저는 Chrome을 추천해요. Safari에서는 일부 기능이 제한될 수 있어요.
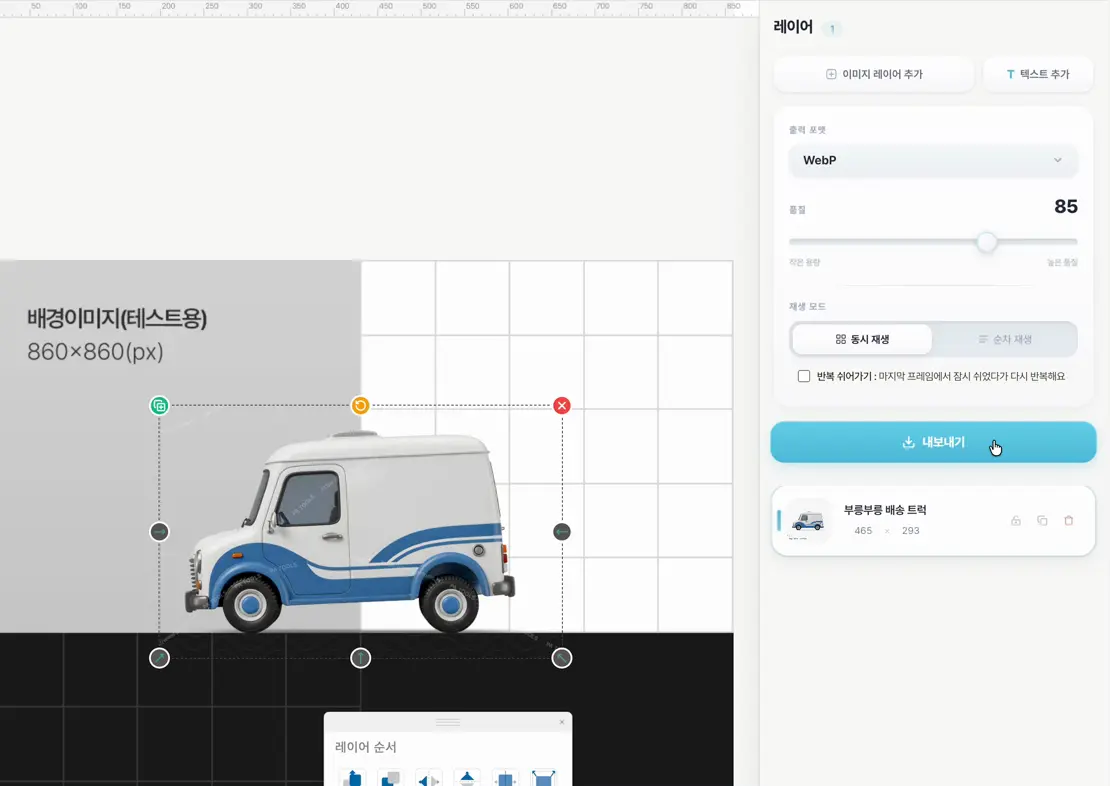
이미지 텍스트 넣기
사진에 움직이는 글자를 넣어 멋진 이미지를 만들어보세요!
이게 뭐예요?
따라해 보세요 (아주 쉬워요!)
화면 왼쪽 위에 있는 "배경 이미지" 부분을 클릭해서 사진을 선택해요. 텍스트를 넣고 싶은 제품 사진이나 배경 이미지를 고르면 돼요!
"텍스트" 부분에서 넣고 싶은 글자를 입력해요. "세일 50% 할인!", "신상품 출시!" 같은 문구를 써보세요. 글자를 입력한 후 "텍스트 레이어 추가" 버튼을 누르면 화면에 글자가 나타나요!
왼쪽 패널에서 글자를 예쁘게 꾸밀 수 있어요:
- 폰트: 귀여운 글꼴, 강렬한 글꼴 등 15가지 이상!
- 크기: 글자를 크게 또는 작게
- 색상: 원하는 색으로 변경
- 테두리/그림자: 글자가 더 잘 보이게 효과 추가
"애니메이션" 부분에서 글자가 어떻게 움직일지 선택해요!
- 페이드: 서서히 나타남
- 위로/아래로: 슬라이드 효과
- 튂: 통통 튀는 효과
- 타자: 한 글자씩 입력되는 효과
- 그 외에도 25가지가 넘는 효과가 있어요!
화면 가운데 캔버스에서 글자를 마우스로 끌어서 원하는 위치로 옮겨요. 테두리의 동그라미를 잡고 끌면 크기도 조절할 수 있어요!
오른쪽 아래에 있는 "WebP로 저장" 또는 "GIF로 저장" 버튼을 눌러요! 파일이 다운로드되면 카카오톡, 인스타그램, 쇼핑몰 상세페이지에 바로 사용할 수 있어요.
알아두면 좋은 것들
- 여러 개의 글자: 텍스트 레이어를 여러 개 추가해서 다양한 글자를 넣을 수 있어요
- 미리보기: "애니메이션 미리보기" 버튼으로 저장 전에 확인해보세요
- 레이어 패널: 오른쪽에서 글자 레이어를 선택하거나 삭제할 수 있어요
- WebP가 더 좋아요!: GIF보다 파일 크기가 작고 화질이 좋아요
- Safari 브라우저: 이 도구는 Chrome, Firefox, Edge에서 가장 잘 작동해요
화면은 이렇게 생겼어요
영상 텍스트 넣기
영상에 예쁜 자막과 텍스트를 넣어보세요!
이게 뭐예요?
따라해 보세요 (아주 쉬워요!)
화면 왼쪽 위에 있는 "배경 비디오" 부분을 클릭해서 동영상을 선택해요. MP4, MOV, AVI 같은 영상 파일을 올릴 수 있어요!
"텍스트" 부분에서 넣고 싶은 글자를 입력해요. "구독 좋아요!", "오늘의 브이로그" 같은 문구를 써보세요. 글자를 입력한 후 "텍스트 레이어 추가" 버튼을 누르면 화면에 글자가 나타나요!
왼쪽 패널에서 글자를 예쁘게 꾸밀 수 있어요:
- 폰트: 귀여운 글꼴, 강렬한 글꼴 등 15가지 이상!
- 크기: 글자를 크게 또는 작게
- 색상: 원하는 색으로 변경
- 굵기/기울임: 글자 스타일 변경
- 테두리/그림자: 글자가 더 잘 보이게 효과 추가
"애니메이션" 부분에서 글자가 어떻게 움직일지 선택해요!
- 카운트: 숫자가 올라가는 효과
- 페이드: 서서히 나타남
- 위로/아래로: 슬라이드 효과
- 튐: 통통 튀는 효과
- 타자: 한 글자씩 입력되는 효과
- 그 외에도 25가지가 넘는 효과가 있어요!
화면 가운데 캔버스에서 글자를 마우스로 끌어서 원하는 위치로 옮겨요. 테두리의 동그라미를 잡고 끌면 크기도 조절할 수 있어요!
오른쪽 아래에 있는 "WebM으로 저장" 또는 "MP4로 저장" 버튼을 눌러요! 파일이 다운로드되면 유튜브, 인스타그램, 틱톡에 바로 올릴 수 있어요.
알아두면 좋은 것들
- 여러 개의 글자: 텍스트 레이어를 여러 개 추가해서 다양한 글자를 넣을 수 있어요
- 미리보기: 저장 전에 영상이 어떻게 보이는지 확인해보세요
- 레이어 패널: 오른쪽에서 글자 레이어를 선택하거나 삭제할 수 있어요
- Safari 미지원: 이 도구는 Chrome, Firefox, Edge에서 사용해주세요
- 영상 형식: MP4, MOV, AVI 파일을 올릴 수 있어요
화면은 이렇게 생겼어요
이미지 크기 조절
이미지 크기를 쉽게 조절하세요!
이게 뭐예요?
따라해 보세요 (아주 쉬워요!)
화면 가운데 있는 "클릭하거나 이미지를 드래그하세요" 부분을 클릭해서 사진을 선택해요. 여러 장을 한꺼번에 선택할 수도 있어요!
왼쪽에서 원하는 너비와 높이를 숫자로 입력해요. "비율 유지"에 체크하면 사진이 찌그러지지 않고 예쁘게 줄어들어요!
원하면 파일 형식을 바꿀 수 있어요:
- 원본 유지: 원래 형식 그대로
- PNG: 투명 배경이 필요할 때
- JPG: 가장 일반적인 사진 형식
- WebP: 크기가 작고 품질이 좋아요
- GIF: 움직이는 이미지
품질 슬라이더를 움직여서 화질을 조절할 수 있어요. 100이면 가장 좋은 품질이고, 숫자가 작아지면 파일 크기가 줄어들어요.
"변환하기" 버튼을 누르면 사진 크기가 바뀌어요. 잠시 기다리면 완료!
변환이 끝나면 "다운로드" 버튼을 눌러서 저장해요. 여러 장이면 ZIP 파일로 한꺼번에 받을 수 있어요!
알아두면 좋은 것들
- 한꺼번에 여러 장: 사진을 여러 개 선택하면 모두 같은 크기로 바뀌어요
- 움짤도 가능: GIF나 WebP 움짤도 크기를 조절할 수 있어요
- 비율 유지: 체크하면 사진이 찌그러지지 않아요
- 안전해요: 모든 처리가 내 컴퓨터에서 이루어져서 사진이 다른 곳으로 전송되지 않아요
- 10MB 이하: 파일 크기가 10MB보다 작아야 해요
컬러 팔레트
이미지에서 예쁜 색상을 추출하세요!
이게 뭐예요?
따라해 보세요 (아주 쉬워요!)
두 가지 방법이 있어요:
- 프리셋 팔레트: 이미 만들어진 예쁜 색상 조합 중 하나를 클릭해요
- 직접 선택: 색상 선택기를 클릭해서 원하는 색을 직접 골라요
더 정확하게 색상을 조절하고 싶다면:
- RGB 슬라이더: 빨강(R), 초록(G), 파랑(B)을 각각 조절해요
- HEX 코드: 색상 코드를 직접 입력할 수도 있어요 (예: #FF5733)
원하는 대로 팔레트를 설정할 수 있어요:
- Algorithm: Tailwind, Material Design 등 여러 스타일 중 선택
- Shade Count: 만들 색상 개수를 5개에서 24개까지 선택
- Contrast Shift: 밝기 대비를 조절해요
"팔레트 생성하기" 버튼을 누르면, 선택한 색상을 기준으로 밝은 색부터 어두운 색까지 자동으로 만들어져요!
만들어진 색상을 클릭하면 색상 코드가 복사돼요. 복사한 코드를 다른 프로그램에 붙여넣기 하면 바로 사용할 수 있어요!
아래쪽에서 여러 형식으로 색상 코드를 받을 수 있어요:
- CSS: 웹사이트에서 바로 쓸 수 있는 형식
- Tailwind: Tailwind CSS 프로젝트용
- HEX, RGBA, HSL: 다양한 색상 코드 형식
- PNG 다운로드: 팔레트를 이미지로 저장
알아두면 좋은 것들
- 프리셋 활용: 처음에는 프리셋 팔레트를 클릭해서 시작하면 쉬워요
- 클릭으로 복사: 색상을 클릭하면 바로 복사돼요
- 대비 확인: WCAG 대비 검사로 글자가 잘 보이는지 확인할 수 있어요
- 다양한 형식: CSS, Tailwind, HEX, RGBA, HSL, OKLCH 등 여러 형식 지원
- PNG 저장: 팔레트를 이미지로 저장해서 나중에 참고할 수 있어요
견적서 생성
프로페셔널한 견적서를 빠르게 만드세요!
이게 뭐예요?
따라해 보세요 (아주 쉬워요!)
왼쪽 패널에서 "사업자 정보" 부분에 회사 이름, 대표자, 주소, 전화번호 등을 입력해요. 로고도 올릴 수 있어요!
"받는 분 정보" 부분에 견적서를 받을 고객의 회사 이름과 담당자 이름을 입력해요.
"항목" 부분에서 판매할 상품이나 서비스를 추가해요:
- 항목명: 상품이나 서비스 이름
- 수량: 몇 개인지
- 단가: 개당 가격
- 금액: 자동으로 계산돼요!
할인을 적용하거나 부가세 포함 여부를 설정할 수 있어요:
- 할인: 금액이나 퍼센트로 할인 적용
- 부가세: 별도, 포함, 면세 중 선택
"특이사항" 버튼을 눌러서 결제 조건, 유효기간 같은 문구를 추가할 수 있어요. 미리 만들어진 문구 중에서 선택하거나 직접 작성해도 돼요!
오른쪽의 미리보기에서 견적서가 어떻게 보이는지 확인하고, "PDF 다운로드" 또는 "이미지 다운로드" 버튼을 눌러서 저장해요!
알아두면 좋은 것들
- 자동 저장: 입력한 내용이 자동으로 저장돼서 나중에 다시 열어도 그대로 있어요
- 프로필 저장: 사업자 정보를 프로필로 저장해두면 다음에 바로 불러올 수 있어요
- 실시간 미리보기: 오른쪽에서 견적서가 어떻게 보일지 바로 확인할 수 있어요
- 직인/서명: 도장이나 서명 이미지를 올려서 더 공식적인 느낌을 줄 수 있어요
- 견적 조건: 유효기간, 결제방법, 작업기간 등을 설정할 수 있어요
화면은 이렇게 생겼어요
영상 자르기
영상에서 원하는 부분만 잘라내보세요!
이게 뭐예요?
따라해 보세요 (아주 쉬워요!)
화면 가운데 있는 업로드 영역을 클릭하거나 영상을 끌어다 놓으세요. MP4, MOV, AVI, WebM 등 다양한 영상 파일을 올릴 수 있어요!
두 가지 방법으로 자를 구간을 정할 수 있어요:
자주 쓰는 구간은 버튼 하나로 빠르게 선택할 수 있어요:
영상 플레이어에서 재생 버튼을 눌러서 선택한 구간이 맞는지 확인해보세요!
"구간 추출" 버튼을 누르면 선택한 부분만 잘라서 새 파일로 만들어요. 처리가 끝나면 "다운로드" 버튼을 눌러서 저장하세요!
알아두면 좋은 것들
- 0.1초 단위: 아주 정밀하게 0.1초 단위로 자를 수 있어요
- 원본 화질 유지: 화질 손실 없이 원본 그대로 추출해요
- 프리셋 저장: 자주 쓰는 구간 설정을 저장해두면 다음에 바로 쓸 수 있어요
- 큰 파일 지원: 2GB 이하의 영상은 처리할 수 있어요
- 다양한 형식: MP4, MOV, AVI, WebM 등 다양한 영상 형식을 지원해요
GIF → WebP 변환
GIF를 더 가볍고 선명한 WebP로 바꿔보세요!
이게 뭐예요?
따라해 보세요 (아주 쉬워요!)
화면 가운데 있는 업로드 영역에 GIF 파일을 끌어다 놓거나 클릭해서 파일을 선택해요.
필요하면 품질과 크기를 조절할 수 있어요. 기본 설정으로도 충분히 좋은 결과를 얻을 수 있어요!
"변환" 버튼을 누르면 GIF가 WebP로 변환돼요. 잠시만 기다리세요!
변환이 끝나면 "다운로드" 버튼을 눌러서 WebP 파일을 저장해요.
알아두면 좋은 것들
- 파일 크기 감소: WebP는 GIF보다 최대 50% 이상 작아요
- 품질 유지: 눈으로 보기에 차이가 거의 없어요
- 브라우저 호환: 최신 브라우저에서 모두 지원돼요
- 투명 배경: 투명 배경도 그대로 유지돼요
- 여러 파일: 여러 개의 GIF를 한꺼번에 변환할 수 있어요
영상 → WebP 변환
영상을 가벼운 WebP 애니메이션으로 바꿔보세요!
이게 뭐예요?
따라해 보세요 (아주 쉬워요!)
업로드 영역에 영상 파일을 끌어다 놓거나 클릭해서 선택해요. MP4, MOV, AVI 등을 지원해요.
영상의 원하는 부분만 선택할 수 있어요. 시작/종료 시간을 설정해보세요.
출력 크기와 품질을 조절할 수 있어요. FPS(초당 프레임)도 설정 가능해요.
"변환" 버튼을 누르면 영상이 WebP로 변환돼요.
변환이 끝나면 "다운로드" 버튼으로 저장해요.
알아두면 좋은 것들
- 짧은 영상 추천: 10초 이내의 짧은 영상이 가장 좋아요
- 파일 크기: GIF보다 훨씬 작은 파일로 만들 수 있어요
- 품질 조절: 슬라이더로 품질과 파일 크기의 균형을 맞추세요
- FPS 설정: 초당 프레임을 낮추면 파일 크기가 줄어요
- 브라우저에서 처리: 파일이 서버로 전송되지 않아 안전해요
영상 → GIF 변환
영상을 움직이는 GIF로 바꿔보세요!
이게 뭐예요?
따라해 보세요 (아주 쉬워요!)
업로드 영역에 영상 파일을 끌어다 놓거나 클릭해서 선택해요.
영상에서 GIF로 만들고 싶은 부분의 시작/종료 시간을 설정해요.
GIF의 크기, FPS, 품질을 원하는 대로 조절할 수 있어요.
"변환" 버튼을 누르면 영상이 GIF로 만들어져요.
변환이 끝나면 "다운로드" 버튼으로 저장해요.
알아두면 좋은 것들
- 짧게 만들기: 3~5초 정도가 공유하기 좋은 길이예요
- 크기 줄이기: 너비를 줄이면 파일 크기가 크게 줄어요
- FPS 조절: 10~15 FPS가 적당해요
- 무한 반복: 기본적으로 무한 반복 GIF가 만들어져요
- WebP도 추천: 더 작은 파일이 필요하면 WebP 변환도 해보세요
이미지 → PDF 변환
여러 이미지를 하나의 PDF로 바꿔보세요!
이게 뭐예요?
따라해 보세요 (아주 쉬워요!)
업로드 영역에 이미지 파일을 끌어다 놓거나 클릭해서 선택해요. 여러 장을 한꺼번에 올릴 수 있어요!
이미지를 드래그해서 순서를 바꿀 수 있어요. PDF에 들어갈 순서대로 정리해요.
용지 크기, 방향, 여백 등을 원하는 대로 설정할 수 있어요.
"PDF 만들기" 버튼을 누르면 이미지들이 하나의 PDF로 합쳐져요.
완성된 PDF를 "다운로드" 버튼으로 저장해요.
알아두면 좋은 것들
- 순서 변경: 이미지를 드래그해서 원하는 순서로 정렬하세요
- 페이지당 여러 이미지: 한 페이지에 1~9장까지 배치할 수 있어요
- 용지 크기: A4, Letter 등 다양한 용지 크기를 선택할 수 있어요
- 회전 가능: 이미지를 90도씩 회전시킬 수 있어요
- 안전해요: 브라우저에서 처리되어 파일이 서버로 전송되지 않아요
대소문자 변환
텍스트의 대소문자를 쉽게 변환하세요!
이게 뭐예요?
따라해 보세요 (아주 쉬워요!)
왼쪽 텍스트 영역에 변환할 텍스트를 입력하거나 붙여넣기해요.
원하는 변환 형식을 클릭해요: UPPER CASE, lower case, Title Case, Sentence case 등
변환된 텍스트가 오른쪽에 바로 나타나요. "복사" 버튼을 눌러서 복사하세요!
글자 수 세기, 공백 제거 등 추가 기능도 있어요.
알아두면 좋은 것들
- 실시간 변환: 입력하면 바로 결과가 나타나요
- 다양한 변환: camelCase, PascalCase, snake_case 등 프로그래밍 스타일도 지원
- 글자 수 세기: 글자 수와 단어 수를 자동으로 세어줘요
- 복사 한 번에: 버튼 하나로 결과를 클립보드에 복사할 수 있어요
- 한국어도 가능: 일부 기능은 한국어 텍스트에서도 사용할 수 있어요
특수 기호 복사
원하는 특수 기호를 클릭해서 복사하세요!
이게 뭐예요?
따라해 보세요 (아주 쉬워요!)
왼쪽 카테고리에서 원하는 종류를 선택해요: 이모지, 화살표, 수학, 도형, 통화 등
원하는 기호를 클릭하면 자동으로 복사돼요. 다른 곳에 붙여넣기 하면 돼요!
검색창에 키워드를 입력하면 관련된 기호를 빠르게 찾을 수 있어요.
알아두면 좋은 것들
- 클릭으로 복사: 기호를 클릭하면 바로 클립보드에 복사돼요
- 검색 기능: 키워드로 원하는 기호를 빠르게 찾을 수 있어요
- 최근 사용: 최근에 복사한 기호가 상단에 표시돼요
- 다양한 카테고리: 이모지, 화살표, 수학, 도형, 통화, 특수문자 등
- 어디서나 사용: 복사한 기호는 카카오톡, 메모장, 워드 등 어디서나 붙여넣기 가능해요
미디어 파일 분석기
파일의 상세 정보를 확인하세요!
이게 뭐예요?
따라해 보세요 (아주 쉬워요!)
업로드 영역에 이미지나 동영상 파일을 끌어다 놓거나 클릭해서 선택해요.
파일을 올리면 자동으로 상세 정보가 표시돼요: 크기, 해상도, 포맷, 지속시간 등
비디오의 경우 코덱, 비트레이트, FPS 등 더 자세한 정보를 볼 수 있어요.
필요한 정보를 복사해서 다른 곳에서 사용할 수 있어요.
알아두면 좋은 것들
- 다양한 형식: JPG, PNG, GIF, WebP, MP4, MOV, AVI 등 대부분의 파일을 지원해요
- 자동 분석: 파일을 올리면 바로 분석 결과가 나와요
- 비디오 정보: 코덱, 비트레이트, FPS, 오디오 정보까지 확인 가능
- 이미지 정보: 해상도, 색상 모드, 파일 크기 등을 확인할 수 있어요
- 안전해요: 파일 정보만 읽고, 서버에 저장되지 않아요
화면은 이렇게 생겼어요
영상 프레임 추출기
영상에서 원하는 장면을 이미지로 저장하세요!
이게 뭐예요?
따라해 보세요 (아주 쉬워요!)
업로드 영역에 영상 파일을 끌어다 놓거나 클릭해서 선택해요.
원하는 추출 방법을 선택해요: 특정 시점 캡처 또는 일정 간격으로 자동 추출
출력 포맷(JPG, PNG, WebP), 품질, 크기 등을 원하는 대로 설정할 수 있어요.
"추출" 버튼을 누르면 영상에서 이미지가 추출돼요.
추출된 이미지를 개별 또는 ZIP 파일로 한꺼번에 다운로드할 수 있어요.
알아두면 좋은 것들
- 자동 추출: 일정 간격으로 자동으로 프레임을 추출할 수 있어요
- 다양한 포맷: JPG, PNG, WebP 중에서 출력 포맷을 선택할 수 있어요
- 품질 조절: 출력 이미지의 품질을 원하는 대로 설정할 수 있어요
- 일괄 다운로드: 여러 프레임을 ZIP 파일로 한꺼번에 받을 수 있어요
- 안전해요: 모든 처리가 브라우저에서 이루어져요
화면은 이렇게 생겼어요
자주 묻는 질문
일부 도구는 무료로 이용 가능하지만, GIF 효과 편집기와 텍스트 애니메이터 같은 프리미엄 도구는 로그인 후 이용하실 수 있습니다. 무료 체험도 제공하고 있으니 먼저 체험해보세요!
네! 대부분의 처리는 브라우저에서 직접 진행됩니다. 업로드된 파일은 처리 후 즉시 삭제되며, 서버에 저장되지 않습니다.
기본 도구들은 무료로 이용 가능합니다. 프리미엄 기능은 월 7,900원부터 이용할 수 있으며, 플랜별 월 크레딧이 제공됩니다. 자세한 내용은 요금제 페이지를 확인해주세요.
문제가 발생하면 페이지 하단의 이메일로 문의해주세요. 24시간 내에 답변드리겠습니다.